Back to Back Blog

Low carb vs low fat for Type II diabetes
Diabetes can be utterly destructive and many just think taking pills that a doctor gives you will sort the problem. It does not!! It only treats the symptoms and does nothing to sort out the disease.

Have a listen to this two-part podcast that talks about the research into low carbohydrate and low fat diets in the management of type II diabetes. In part 2 of the podcast, it discusses more on nutritional advice for the management of type II diabetes.
How a read and empower yourself with the knowledge it gives you to either help yourself to offer advice to someone in need.
Diabetes can be utterly destructive and many just think taking pills that a doctor gives you will sort the problem. It does not!! It only treats the symptoms and does nothing to sort out the disease.
Some of the management of this massively difficult problem is about the need to change and adapt dietary choices, but it is also important to make good lifestyle choices such as taking regular exercise, improving the amount and quality of sleep you get and managing one’s level of stress.
LINKS
If you need any help with the above subject, see your doctor or a good healthcare provider with an interest in the subject.
Blog post by James Dodd

Sleep – are you getting enough or enough ‘good’ sleep?
SLEEP is much more important than most of us think. It is actually a massively crucial time for our bodies to rest and heal and for us to lay down new tissue. It is also an important time for our brains to process what has happened that day and ‘back up’ its new memories.

SLEEP is much more important than most of us think. It is actually a massively crucial time for our bodies to rest and heal and for us to lay down new tissue. It is also an important time for our brains to process what has happened that day and ‘back up’ its new memories.
An adult should be getting 7-9 hours sleep a NIGHT!!
Here are ten tips to try and improve your sleep. I hate the phrase Sleep hygiene.
Try to do all of some of these. The more regularly you do them the better. Some will be hard to do all the time, but try to do at least 3-4 times a week. Sleep helps us function better and improved sleep helps with stress levels.
Sleep in a dark, quiet and cool room.
GO ‘device free’ at least one hour before bed
Use bedroom for sleep only (other than the obvious!!)
Nap wisely (before about 3pm) but do not look at naps badly.
Get out of bed if you cannot sleep (use the 20 minute rule)
Maintain a consistent, regular bedtime routine
Do not go to bed hungry
Finish exercise at least 3 hours before bedtime
No alcohol or nicotine for 3-6 hours before bedtime
Stop caffeine 6 hours before bedtime
Back pain and a large number of other conditions have been closely linked to poor sleep.
For more information look to
The Sleep Society and the The Sleep Council
https://www.sleepsociety.org.uk
Blog post by James Dodd
A guest blog by Gary Ward on bunions
As seen on BBC’s Dr. In the House – Gary is an author, educator and speaker on the subject of human movement and anatomy. He is the inventor of the Flow Motion Model: a simple description of what the body does and when it does it.
As seen on BBC’s Dr. In the House – Gary is an author, educator and speaker on the subject of human movement and anatomy. He is the inventor of the Flow Motion Model: a simple description of what the body does and when it does it.

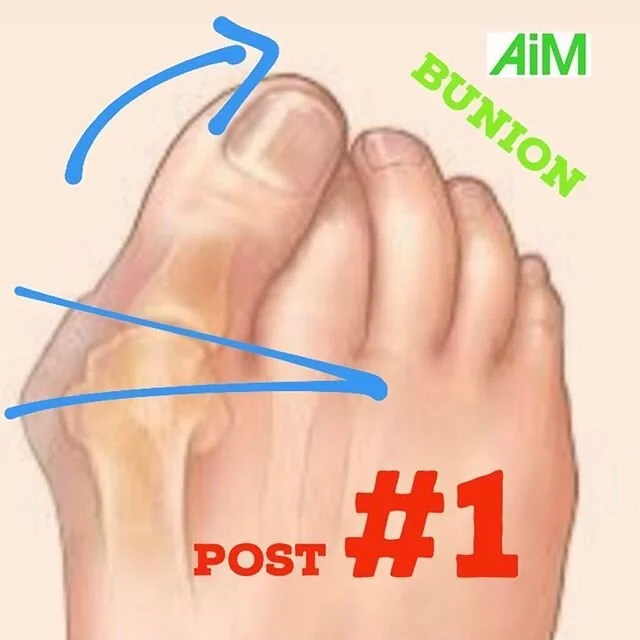
POST 1: HALLUX VALGUS
👣 When the foot pronates the forefoot abducts away from the body’s midline (see photo above). In this moment the big toe follows the movement of the forefoot – away from the body’s midline. A flatter pronated foot is known as a valgus foot. A bunion – although there do appear to be two types of bunion is known as a hallux valgus. Effectively a pronated toe.
👣 A bunion is present where this movement of the toe (away from the body’s midline) is greater than it should be. It’s more valgus than it should be and we could suggest more pronated than it should be. In this case there is excess gapping at the first MTPJ (or big toe joint) – which is where a bunion is located as marked by the blue V on the image.
👣 Foot pronation as you likely know is a specific shape in the foot created by the 26 bones and 33 joints in the foot. Each of the joints on the midline of the foot should open / gap as the foot pronates. It is often the case that a bunion forms where there is excess opening in this joint. Excess opening of a joint appears to make up for a lack of such gapping at other related joints.
👣 More often than not you can look one joint up in the midfoot at the 1st metatarso-cuneiform joint to find that it is unable to open (I.e. abduct). In order to generate the necessary motion of pronation in the foot, the toe must pronate more now due to the lack of pronation in the midfoot, and the gapping will thus be excessive creating an environment for a bunion.
👣 In this scenario, the bunion is not the problem but may actually be acting as a solution (giving you more at one joint to make up for less at another).
👣 Can you get the joints of the midfoot opening in a pronation movement while mobilising the big toe joint to take the pressure off your bunion?

POST 2: THREE DIMENSIONS OF METATARSAL MOTION
👣 For the purpose of this post:
Proximal = closest to belly button
Distal = farthest from belly button
👣 There are three dimension of metatarsal motion. The first metatarsal is the long bone that connects to the big toe. The metatarsal head is the big toe knuckle at the end of the first metatarsal. The space between the two is your 1st MTPJ (metatarso-phalangeal joint) where your bunions are located.
👣 A metatarsal can dorsiflex (proximal end of bone lowers to the ground) – which is normal in pronation – being stuck in this position makes it hard to get the first metatarsal head on the ground and often you see the toe press down to create contact with the ground instead. This creates gapping at the top of the toe joint and can lead to inflammation. Teaching the first metatarsal head to sit on the ground in all movement is a start point for this…
👣 The metatarsal can also invert, that is to roll on it’s axis as if the top of the long bones rolls towards the outside of the foot while the base of the bone rolls towards the inner part of the foot. This is normal again in pronation, but if stuck there with no opposition in the big toe then your toe nail may also have rolled towards the outside of your foot. Both of these contribute to poor timing on your gait and increased pressure on the bunion joint.
👣 Finally the metatarsal abduction that is necessary for pronation (see bunion post #1) is often not present in a persons forefoot. More likely the metatarsal is adducted (where the distal end of the long bone is pointing inwards to the centre line of the body). This implies that the joint proximal to the long metatarsal bone towards the mid-foot is stuck closed and the big toe adopts it’s open joint valgus position.
👣 With the metatarsal adopting one or more of these positions in your foot is a likely contributor to bunion heaven….

POST 3: A SHIFTED BUNION
👣 I mentioned that there are two types of bunion. One is the valgus type already mentioned in post #1. The other is more shifted! (Translated – moved laterally)
👣 This can, again, be linked to the closed joint in the midfoot at the back of the long metatarsal bone. More adducted than it could be… This metatarsal adduction (distal end of the metatarsal pointing toward the midline of your body) is perhaps more excessive than with a valgus toe, as here the metatarsal seems to bypass the max rotational range of the toe and instead the toe slides right off the end of the metatarsal 😳
👣 Checking the bunion, I often find this type less sore, less red or swollen and certainly less calcified. You can easily palpate the end of the normal metatarsal bone. Nice 😃
👣 If you apply medial pressure to the distal end of the metatarsal (opposite to the arrow in the picture), you might find it pops back in, but doesn’t stay there. So the trick is to begin to work out how to open the joints in the midfoot and straighten the metatarsal out 😃
#pronation
👣 It might help to use some tape or toe straighteners in conjunction with movements that get those midtarsal joints opening up on the inner side of your foot so that you can bring the metatarsal and the toe back in line..

POST 4: SO WHY ARE THESE JOINTS CLOSING?
👣 Well this is a big question because it involves having an appreciation of inter-joint relationships in the body WHILST ALSO recognising that the body is 100% functional all of the time. This means that if something can’t, then something else will….
👣 Foot pronation is actually a whole body motion. WHAT? Yes, when the foot pronates there is one single distinct whole body pattern that occurs simultaneously. In this whole body position specific joints open and specific joints close.
👣 If the bunion joint opens excessively. One or more of the other joints that should open remain closed. Or can not open enough! This can be due to injury, learnt patterns, adaptations in the body etc… Many things.
👣 When we pronate our feet the bones on the medial aspect of the foot, knee and hip all open in the transverse rotational plane. That’s knee and hip external rotation as well as normal foot pronation. Check it out 😃
👣 PS if one of these joints is already WIDE OPEN in resting posture, it cannot open anymore… so something else is still required to open for that joints lack.
👣 I call it the Great Exchange. If something moves little, something else must move more. If something shifts forward, something else must shift back. All with an intention to create balance and keep you functional… all of the time 😃

POST 5: TAKING YOUR BUNIONS OUT FOR A WALK?
👣 Did your walk create the bunion or has your bunion created your walk?
👣 It’s possible that the way you walked before the bunion showed up is what may have lead to your bunion. If this is true perhaps we can stop blaming shoes or other common explanations such as being hereditary for example (I’m not personally a fan of ‘hereditary’ as it’s a wonderful excuse and puts a full stop into any investigation). Even if it is, let’s not allow that old chestnut to prevent us from doing something about it ….
👣 Over pronation for example can mean that we turn our feet out (10 to 2 aka duck feet), this limits our ability to supinate our feet and places pressure on the inner borders meaning that we roll off the inside of the big toe as we push off, forcing that joint to open…
👣 Heavily weight bearing on one leg can also increase the load placed on that first metatarsal with each stride taken. Becoming dominant on one side of your body can arise out of injury, gait patterns, adaptation and, again, habits… perhaps a habit you learned watching a bunion laden parent walk barefoot around the house when you were young 😆. This one sided-ness can lead to a bunion on one foot and not the other…
👣 Bunions make it notoriously difficult to unconsciously supinate a foot when you walk – this removes a whole host of beneficial movement from the body as a whole.
👣 Don’t be held prisoner by your bunions and in the same breath, don’t let today’s lazy feet create an environment for a future bunion either.
Your bunion leg may have knee problems, hip flexor issues, groin issues, weak glutes and even sore low back… addressing the foot in this case will go a long way to helping whole body symptoms.
👣 Unfortunately, changing your walk is not something I believe to be effective. Targeting the joints that contribute to how you walk… is… key.

POST 6: FOR A BIT OF FUN YOU CAN CHECK TO SEE IF YOUR BUNIONS AFFECT THE REST OF YOUR BODY?
👣 Standing square on a flat surface, rotate your pelvis left and right, independent of the ribcage. Gauge the range, comfort, discomfort and ease of access to one side over another.
👣 Do the same with your ribcage, independent of the pelvis, rotating left and right and again assess the same rotational movement with your neck.
👣 For both, gauge the range, comfort, discomfort and ease of access to one side over another. Perhaps make a note before reading on… Now politely ask someone to straighten your bunions out (point the toes forward) and see if your rotational ranges at any of these three motions improve 😃
👣 If yes, and let’s say you have neck pain or neck limitations, and your neck range increases from doing so, then you may begin to recognise that it’s not a neck problem but a whole body problem; a functional whole body problem…
👣 So let’s get those bunions addressed and how about a self assessment of your own whole body?
👣 Notice that if holding your bunions straight makes life easier… then it’s a good thing to hold them straight, enjoy the movements, enable your brain to experience the motion in your body and then let your toes go and go for a walk.
👣 Taking the restriction (bunion) out of the game enables your brain to experience these long lost movements again and again and slowly your body can learn to be free to move again.
👣 Trust me when I say your brain would always choose to use the neck for neck movements instead of your toes.
👣 So let’s give it a chance to do so… let the new movements talk to your brain and the two will come to an amicable agreement 🙂 I hope you’ve enjoyed my bunion posts and hopefully found them useful….
👣 Please check out the bunion highlight on my page to see more answers to the questions that were posed in the summer….
👣 If YES to a self assessment of your whole body then please click this link >>> Wake Your Body Up to begin your AiM self-assessment…
👣 That’s it from me for bunions for now. Thanks for your engagement and sharing – Gary Ward.
RESOURCES:
Gary’s Website: https://www.findingcentre.co.uk/
Gary’s Wake Your Body Up Self Assessment: https://www.findingcentre.co.uk/wakeyourbodyup/
Social Media
Instagram: https://www.instagram.com/garyward_aim/
Facebook: https://www.facebook.com/anatomyinmotion/
Twitter: https://twitter.com/garyward_aim?lang=en
FOR MORE FANTASTIC VIDEOS, PODCASTS, ARTICLES AND PRACTICAL MOVEMENT EXPLORATIONS FROM GARY HEAD OVER TO THIS PAGE.

Syndesmosis injuries are often missed and why…
Syndesmosis injuries do happen and they probably happen more than we think. They are often missed and are treated as a ‘normal’ lateral ankle sprain.
Syndesmosis injuries do happen and they probably happen more than we think. They are often missed and are treated as a ‘normal’ lateral ankle sprain.
Anatomy
You have two bones in your lower leg, the tibia and the fibula. The point just above the ankle where these two bones meet is called the syndesmosis. The tibiofibular syndesmosis is a fibrous joint joining the fibula to the tibia and stabilized by four lateral ligaments: the anterior inferior tibiofibular ligament (AITFL), the interosseous ligament (IOL), the transverse ligament (TL), and the posterior inferior tibiofibular ligament (PITFL)
An ankle syndesmosis injury is often called a ‘high’ ankle injury or sprain. It can be missed in the early stages as the amount of pain and swelling is not always proportionate or may not reflect the severity of the injury. Swelling can often be much less that the ‘normal’ ankle sprain. Remember ‘a simple ankle sprain’ is not always ‘a simple ankle sprain’.
Patients with a syndesmosis injury will describe a mechanism different to a lateral ankle sprain in that they did not roll over on their ankle. Pain is often felt above the lateral malleolus, but they may also feel medial ankle pain in a severe injury.
One of the most common mechanisms of this injury is with forced external rotation and dorsiflexion at the ankle. This is often with the foot caught on the floor and the knee is forced forwards and around.
Ankle Sydesmosis injury Classification
Grade I AITFL – an isolated injury
Grade II AITFL and interosseous injury
Grade III AITFL, PITFL and interosseous injury
Grade IIII AITFL, PITFL and interosseous injury as well as the deltoid ligament.
With grade I injuries, there is a degree of pain, but they are not unstable and can be managed in a way similar to that of a grade I MCL injury with strapping and a short period off sport.
Grade II requires experience to differentiate between a stable and unstable. Grade III and above is normally managed with surgical intervention.
Tests
Reliable tests for syndesmosis injuries are a few, but the most sensitive is the hop test.
Others are ‘knee to wall’ test, ‘Dorsiflexion/external rotation’ test, palpation of the ligaments, ‘squeeze test’, ‘fibular translation’ test and ‘anterior draw’ test. Remember that no test in isolation is good enough for diagnosis.
Acute Management
I am not going into the treatment of this sort of injury, but great advice that seems to be consistent with some experts is to put people into a boot when you suspect a syndesmosis injury. This immobilises the ankle and you can modify weight bearing for the first 24-48 hours. This just gives this area a chance to calm before treatment commences. This improves the reliability of the examination by waiting for the initial pain and inflammation to settle. A management plan can then be made.
Treatment must also involve the rest of the body, not just the poorly ankle. Integration of the knee and hip along with the rest of the body encourages better and faster return to sport.
Further Reading
https://www.ncbi.nlm.nih.gov/pmc/articles/PMC4128849/
https://www.ncbi.nlm.nih.gov/pmc/articles/PMC4094093/
https://www.ncbi.nlm.nih.gov/pubmed/26725452
https://www.ncbi.nlm.nih.gov/pmc/articles/PMC5370648/
If you are struggling with an ankle injury – get it properly assessed and treated. If you would like to see one of our sports osteopaths, call 020 8605 2323.

Achilles Tendon Pain
Achilles tendon pain - examination, tests and rehabilitation thoughts.

Here are some really interesting snippets about Achilles Pain.
EXAMINATION
The assessment must include a thorough case history and examination and one is needing to establish the site of pain and the aggravating and relieving factors.
One of the main aggravating factors that fit a ‘tendon pattern’ is pain with increased load. This may be during or after exercise. The site of pain is localised around the achilles tendon, normally 2-6cms from the insertion. The patient will often point to where they feel their pain. There may or many not be swelling or a ‘bump’ on or around the tendon.
TESTS
Other than observation and palpation, there are a couple of really great tests. The London Hospital Test and the Painful Arch Sign.
The London Hospital test is where the clinician pushes on the sore area and then passively dorsiflexes the ankle and then pushes on the tendon again in the same place. A positive test is where there is a reduction in pain. Tendon expert Seth O’Neil feels that this finding is due to the additional stretch to the tendon tightens the exterior of the tendon and this protects the interior or deeper parts of the tendon. The deeper areas are where most achilles problems stem from.
The Painful Arch Sign is to distinguish between a tendon and a sheath problem. By gripping the swollen area and then dorsiflexing the ankle the clinician is looking to see if the swelling is moving as you move the ankle. If it does move as you move the ankle, it suggests a tendon problem. If it is a sheath problem, the swelling should not move.
You do need to exclude all other pathology. One of the most common differential diagnosis of Achilles Tendinopathy is posterior ankle impingement. This clip shows you how to examine for this. But there are still many other causes of pain to the back of the heel and these do need to be ruled out.
People normally get some sort of achilles pain when they have increased the demand on these tendons over and above what their bodies are able to adapt to.
REHABILITATION THOUGHTS
Advice on how to rehabilitate these no longer invoices trying to stretch the tendon. They now know that in Achilles Tendinopathy, the tendon becomes more pliable and so does not need to become more pliable. We need to try and help it to become stiffer again. The soleus is often more involved with achilles tendinopathy than the Gastrocnemius.
The main model of rehabilitation is about load using eccentric and concentric and isometric. These may be used at different stages of the treatment depending on how reactive the tendon is. It is often found that there is a great deficit in power in those with achilles tendon problems.
Studies have shown that tendon stiffness does increase with resistance training. One study mentions a 19% increase in stiffness after 8 weeks. But the load needs to be progressive towards 80% of the patient’s one rep-max (1RM). This will need to happen over time. With lower loads of 20% of 1RM, they saw no adaptation in the tendon. When returning patients to high level activity, rehabilitation should incorporate external loads of at least 50% body weight. That is key and super interesting!!
The soleus is predominantly involved in Achilles tendinopathy and should she it should a large part of the target of rehabilitation.
It may be appropriate to perform exercises 3 times per day for both sedentary and the athletic population. This is based on data looking at the response of bone cells to loading in osteoporosis. Bone cells peak at around 45 hops and are stimulated for 5-6 hours after loading. This is probably similar for tendon cells as they are derived from the same cells (fibroblasts). SO don’t overdo the load – but trying towards 3 times a day certainly makes scientific sense.
BE gradual when increasing the load. Don’t add too much much weight too soon or it will make you sore and do work within your patterns of soreness.
Being patient with longer standing achilles problems is REALLY key.
Depending on the severity of the tendonopathy, it could take a few months to get really good adaptation back in the tendon, although you should feel good changes in 3-6 weeks.
Here at Back to Back, we really feel it is critical that you DO NOT look at the Achilles Tendon in isolation! Foot function, whole leg function and how well the same side hip and the opposite hip load and unloads often highlights as to why there may have been a problem to start. Observation of these must be part of you assessment and management , NOT just your sore achilles tendon.
If you need some help with rehab or what to talk to one of our great sports Osteopaths, call the clinic on 020 8605 2323. Before embarking on any heavy loading, do ask a health professional.
Sever’s Disease. Heel pain in children.
Essentially, it is an overuse injury at the time of growth.
Sports that ‘load’ the Achilles tendon and heel, such as running and jumping, are normally the culprits. Often a bout of Sever’s can become aggravated at the start of a season after a ‘rest’ period, or exercising on harder ground as it gets colder.
Causes
Essentially, it is an overuse injury at the time of growth.
Sports that ‘load’ the Achilles tendon and heel, such as running and jumping, are normally the culprits. Often a bout of Sever’s can become aggravated at the start of a season after a ‘rest’ period, or exercising on harder ground as it gets colder. Tightness in the calf can also lead to an increased load on the heel bone. In bad cases, it may take until the child stops growing before complete resolution.
Other important areas to look at as to ‘why’ this may have happened, are ankles that do not move well and/or feet that are stiff which result in the force from the ground being poorly dissipated.
Also hips that are unable to give the range of movement required can increase the load to the achilles and heel bone, leaving the heels to take the hit! This is key to successful treatment. The symptoms and the diagnosis is Severs Disease, but it is not telling you ‘why’ this is happening.
Diagnosis
The diagnosis of Sever’s Disease needs to be based on a full and correct examination by your osteopath, doctor or other medical professional. An X-ray or MRI scan may be used to confirm the diagnosis or monitor the progress, but often this is not necessary.
Treatment
Calcaneal apophysitis has no known long-term complications. This is self-limiting in that it should go away when the two parts of bony growth eventually join together (occurring around 16 years of age).
It is important to limit (temporarily) excessive or rigorous activity in its painful stages. This needs to be about management, as you can get times when it calms and at other times when it can flare up again as they increase activity. Soft shoes and heel cups can make a difference. It is important to make sure the child has sound biomechanics (e.g. no excessive pronation or muscular imbalance). Regular and correct stretching of the tight muscles in the calf and thigh are essential. Ice can be of great help if used correctly. Anti-inflammatory medication may be of use, but do check with your medical professional about this first.
Seeking treatment from your osteopath or good physical therapist can really help too. They will check for poor biomechanics, work and stretch the calf and thigh, and manage this injury with some good strengthening exercises.
Return to sports or activity
The goal here is to get your child back to their desired sport or activity as soon as safely possible. It may be a gradual return to see if the condition regresses. If they return too early, it may lead to more chronic pain.
To return to sport your child should have no pain at rest and should be able to walk pain free. They should also be able to jog, sprint and hop pretty much symptom free as well..
After the pain resolves it is important that there is still a regime of regular stretching of their calves, thigh and leg muscles in place.
If you have any questions or would like us to look at your musculoskeletal problem, please book in to see an osteopath at Back To Back on 020 8605 2323.
If you suffer from an acute muscle injury and are not sure what to do, it is always suggested that you see your GP, Osteopath or Physiotherapist for further assessment and advice on treatment and management.

Do you get pain when playing golf?
At Back to Back we treat more than a few golfers and their injuries. An injury common to the golfer may be one of many…. But often a golfer presents with pain in their elbow, shoulder, their back, hip or knee. Pain is all too common in golfers!

At Back to Back we treat more than a few golfers and their injuries. An injury common to the golfer may be one of many…. But often a golfer presents with pain in their elbow, shoulder, their back, hip or knee. Pain is all too common in golfers!
Identifying with their pain can be the easy part. Working out why they have pain is often a little more challenging.
Assessment of injuries
Our AFS (or Applied Functional Science) team will be best to do this. Their aim is to track down the ‘why behind the what’. What I mean by this is … why has that particular area of your body failed? Which area in that person’s body is not working as it should and increasing the ‘load’ elsewhere?
I saw a patient last year and remembered this all too common story. He was in his late forties with a handicap of 4! He had been suffering with right shoulder pain for the previous 5 months! He had seen a few other practitioners before finding his way to the clinic.
To me, it was crucial to see him swing as if he was hitting the ball! Watching this and adapting the way he hit the ball, it immediately became apparent that he was restricted in his left hip. As he was halfway through his backswing the movement that should have been available at his left hip was not there and he was then using his upper back and right shoulder to do much more work than it needed or was build to do.
All that was happening was his shoulder was becoming strained because of his hip! Before coming to see us, this lovely patient had had his shoulder and surrounding area rubbed for 14 treatments. Working with his left hip and left foot and integrating them into his swing gave great results in 3 treatments and he was almost pain free at 4 treatments. He still has a small way to go, but it just goes to show that rubbing symptoms (in this case the shoulder) is not always the right answer. Getting fully assessed by someone that appreciates integrated movement and treats the body as a whole is critical.Get assessed properly and get properly fixed!

Could your groin injury be coming from your hip?
Groin pain can be a difficult problem for patients as well as their clinicians. Part of the problem is that the location of the pain is often a poor indicator of the where the pathology actually lies. Additionally, when the pain becomes chronic, multiple pathologies can be generated, adding a further layer of complexity.
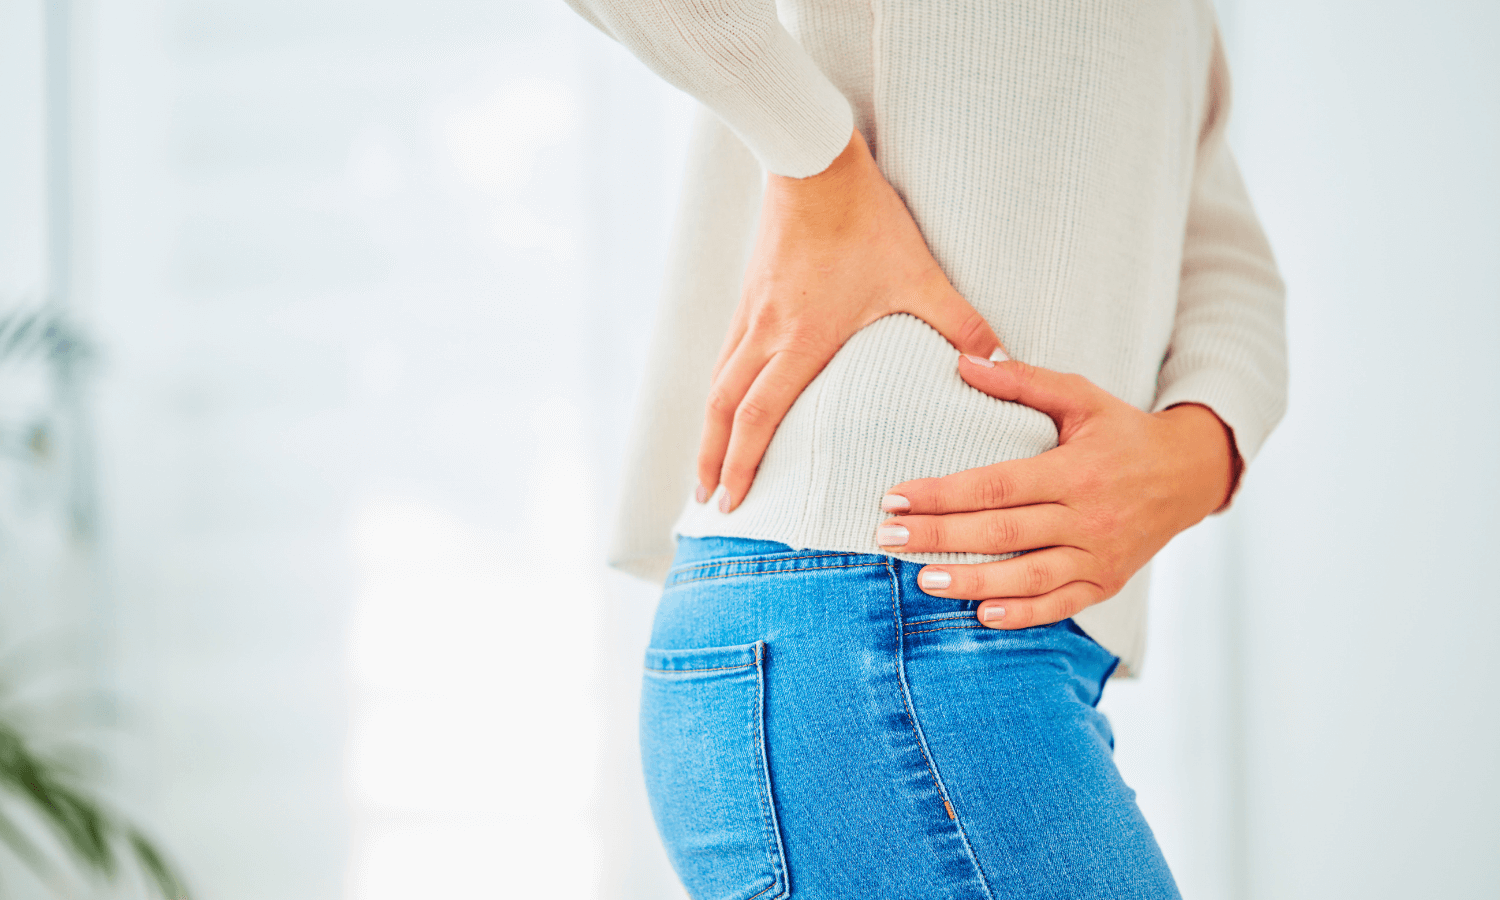
Groin pain can be a difficult problem for patients as well as their clinicians. Part of the problem is that the location of the pain is often a poor indicator of the where the pathology actually lies. Additionally, when the pain becomes chronic, multiple pathologies can be generated, adding a further layer of complexity.
It is very important to make a clear diagnosis. We should seek to look beyond merely labelling the problem as a ‘groin sprain’. There many causes of pain in the groin. Approximately 50% of groin pain can be attributed to pain generated by the hip joint; a surprise, perhaps, for younger patients. As in any medical condition, the patient’s history will give us many clues. It is extremely important to rule out sinister ‘red flags’. These could be night pain, severe pain on loading the leg, weight loss or systemic symptoms, and we need to be mindful of conditions which may occur in certain age groups, such as a slipped epiphysis in teenagers.
Common causes of groin pain besides the hip, include those generated by the lumbar spine, pubic overload (osteitis pubis), iliopsoas and adductor tendon pathologies. You need to be aware of stress responses in the femoral neck in runners. Abdominal wall hernias may cause pain which is a little higher in the groin. Less commonly, younger patients can experience the rectus femoris pulling away from its attachment at the anterior inferior iliac spine. Testicular tumours and avascular necrosis can present insidiously and we need to be on the lookout for them.
A big proportion of patients who present with groin pain as a result of hip pathology, have an underling condition known as ‘femoral acetabular impingement syndrome’, or FAI. This is essentially a problem resulting from a tear in the acetabular labrum, usually caused by repetitive trauma. This may be due to a ‘bump’ or ‘CAM’ on the head neck junction of the femur, which may be acquired or genetic.
This can cause groin pain which is worse with exercise, sitting or standing. The pain can be brought on by putting the patient in the ‘impingement position’ of hip flexion + internal rotation + adduction. In the long term, we believe that the tear in labrum causes changes in the acetabular articular cartilage next to it, and over many years, this may lead to osteoarthritis in the hip.
FAI can affect people of all ages, and is often missed in 30-40 year olds. Taking a careful history, and carrying out a thorough examination can help identify the likely cause. Imaging, such as 3t MRI of the hip, can help confirm the underlying diagnosis (as X-Ray cannot rule out FAI). It should be remembered that imaging needs to be interpreted in light of the history and examination findings. FAI may require treatment with hip arthroscopy surgery, but in some cases injection therapy and robust physiotherapy or osteopathy may be enough to get a person back to full activity.
Sports Physicians and Osteopaths are ideally placed to identify the underlying cause of unexplained groin pain, and are skilled in directing the rehabilitation necessary to resolve the problems.
If you have any problems at all and would like in to see James Dodd or one of the team at Back to Back, please call 020 8605 2323.
1080 Map Functional Assessment
Developed in Norway and Sweden, 1080 Map Functional Assessment is a specialist assessment tool with software that is designed specifically for those committed to becoming more successful in their training and to improve their movement patterns.
James at Back to Back is now offering an exciting new service called 1080MAP™. Developed in Norway and Sweden, it is a specialist assessment tool with software that is designed specifically for those committed to becoming more successful in their training and to improve their movement patterns. It is also a great tool to be used alongside rehabilitation protocols.
1080MAP™ assesses, analyses and optimises movement patterns to maximise your physical performance. There really is nothing like this in the world that assesses and maps out your movement patterns and using specialist software, it gives clear results to show how well your body moves! At the time of writing, there are only a couple of people with specialist training in London to do this and we have been lucky enough to be part of this.
This functional assessment is a unique, effective and accurate test system for determining a person’s fundamental ability to move and control movement. The system is based on combinations of full-body movement patterns that give results that will determine what may be needed to improve athletic ability or everyday function.
The first level of 1080 MAP covers mobility and stability as this is the foundation of any human movement and physical performance.
To measure full-body three dimensional movement patterns the 1080 MAT is an easy-to-use tool. It consists of a circular test area divided by vectors. Measurements in centimetres and degrees provide the input to the 1080 MAP database.
1080 MAP stands out as the only scientifically validated method that is repeatable for mobility and stability assessment.
Assessment
The measurement of movement patterns in standing positions to quantify function. Quantification of mobility, stability, strength, power, endurance and performance.
Analytics
The different tests are scored are then combined and directly linked to each other to create unique individual profiles. All profiles reflect physical performance, identify physical limitations and hidden potential.
Optimisation
1080MAP™ results in highly specific and individualised treatment and training programs that will optimise functional performance.
The picture below is the 1080Map of an elite athlete who was struggling with lower back pain for years. The graphic below shows some of the information we produced. It highlighted problems with her left hip (from left picture) and foot that had not been seen from previous assessments. The new and crucial information was then used in her treatment plan to target her left hip and foot. These were integrated into her movement patterns. She now is able to run really good distances and she is stronger with much less pain.
Test results are captured, analysis is done, and feedback is given from the 1080 MAP cloud based client management system. Here, each client’s results can be compared over time, on detailed level or by using a composite mobility score. Comparisons can also be done against the entire data base population based on gender, age, sport and performance level. Based on the analysis, feedback can be sent directly to the client.
If this could be something of interest to you, call the clinic on 020 8605 2323 and book into see James for a 1080 map assessment. Here is a link to more information. Our website also gives you information about the clinic.

Loosing the boozing-reduce your Alcohol for a healthier you
Although you may first visit your osteopath to treat an injury or condition, a priority of the osteopath is to help you improve your overall health and wellbeing.

Alcohol after a busy Festive period
Although you may first visit your osteopath to treat an injury or condition, a priority of the osteopath is to help you improve your overall health and wellbeing.
There are a range of things that we do to our bodies that can help or hinder this, such as exercise and diet. Another significant factor is alcohol consumption.
With the new year underway, you may be looking to kickstart 2018 with a range of healthier living decisions. You may be trying the ‘Dry January Challenge’, to go without alcohol for a month. Or maybe you are looking to reduce how often or how much you drink.
If you experience joint pain, excessive alcohol can impede your bodies ability to repair and also interact badly with some medication.
Long term excessive drinking can also cause:
*Brain damage
*Increased risk of throat and mouth cancer
*Increased blood pressure and heart disease
*Inflammation of the stomach lining, stomach ulcers and increased risk of stomach and bowel cancer
*Liver damage and cancer
*Reproductive problems
*Mental health difficulties
Blog Post by James Dodd
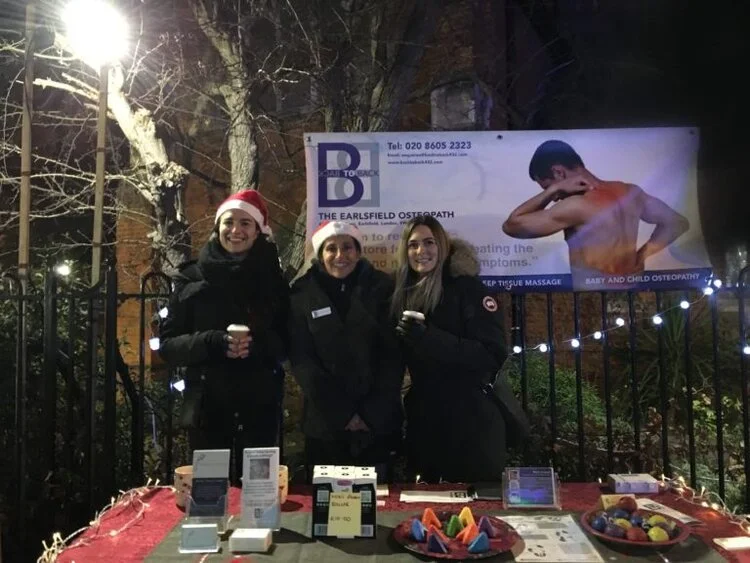
The Christmas Fair in Earlsfield. Back to Back was there supporting the community.
Last week the team braved the cold at the Christmas Fair in Earlsfield with the help of hot drinks. They answered many questions and gave out key information to those that needed it. It was a privilege to have been there.
EARLSFIELD CHRISTMAS FAIR
Last week the team braved the cold at the Christmas Fair in Earlsfield with the help of hot drinks. They answered many questions and gave out key information to those that needed it. It was a privilege to have been there.
It was wonderful to see so many of you out there that had already had been helped by the clinic.


The endangered glutes!
There’s a fairly obvious giveaway about the importance of our gluteal muscles; they are rather big! Having a big, powerful set of muscles such as the glutes should indicate to us that, through our evolution, the body has developed a demand for strength and power in that area.

Why are they not firing and what to do about it.
There’s a fairly obvious giveaway about the importance of our gluteal muscles; they are rather big! Having a big, powerful set of muscles such as the glutes should indicate to us that, through our evolution, the body has developed a demand for strength and power in that area.
Human anatomy has evolved to cope as efficiently as possible with the forces exerted upon it. Perhaps the most important force of all is gravity. Every time you take a stride, or step off from a curb, or land from a jump, there is a demand for the body to control this movement. Without our muscular system engaging to catch us, we would collapse like a bag of bones under the force of gravity.
The most powerful hinge in the body, which has evolved to adsorb these forces, is the hip. It makes sense, therefore, that the hip would need a big set of muscles surrounding it in order to absorb these forces and exert the control that is required – hence the big glutes!
Having developed a powerful set of muscles such as the glutes, it would be efficient for the body to regularly recruit their power when performing tasks. If I want to perform a movement efficiently, such as bending down to empty the dishwasher, I would like the powerful parts of my body to control this movement – rather than the smaller and more vulnerable muscles.
If we don’t use the large muscle groups appropriately, then smaller muscles may be asked to do more work and may end up failing.
The importance of the glutes is widely recognised and often discussed in gyms and clinics all over the world. You may have even been told that “your glutes aren’t firing” and may be currently trying to rectify this! Unfortunately, however, the glutes are often blamed (and trained) in isolation.
A lack of understanding of how the glutes work, leads to a very limited approach to gluteal training. The important question to ask is; why are the glutes not firing? Only by answering this will you be able to improve your gluteal activation and strength.
So, why do so many of us under use our glutes and how do you actually get them to work harder for you?
Evolution lesson #1 – use it or lose it!
I always feel that any announcement to a patient that “your glutes aren’t firing” should be delivered with a caveat. The caveat being that, for most of us, this is simply a bi-product of our modern lifestyles, it is not an unfortunate affliction that you just happen to be unlucky enough to have developed. Don’t worry; we’re all in the same boat. It’s not your fault!
A quick look at the animal kingdom can help to explain this point. Often we identify animals by their anatomical features, without necessarily knowing that we do so. If I asked you to look at the images below of the Capuchin Monkey and the Springbok and tell me where their “big bits” are, then I’m hoping you would say the Capuchin’s tail and the Springbok’s hind legs.
Even without knowing the habits of these animals, you would probably be able to make a fairly good guess as to what they were good at. The monkey has a powerful tail for climbing and swinging from trees, the Springbok has big hind legs for jumping.
Their anatomy has evolved to be fine-tuned for their lifestyles, habitats and activities and their continued success as a species is dependent upon them using these powerful areas to gain advantages in the wild. These animals take maximum advantage of their powerful areas!
This is where the problems for humans arise. We are far more sedentary now than at any time during our evolution. For many of us, the continued demands required to maintain the strength and power of our big muscle groups has significantly reduced. Our anatomy has been fine tuned to cope with regular, unpredictable, multi-directional movement such as jumping, landing, walking on uneven ground, running, sprinting, changing direction. By sitting, moving less and existing in very flat, unchallenging habitats we are no longer putting these demands on our bodies.
The gluteal muscles fire when they are placed under load through movement combined with the forces of body weight and gravity. They respond to three dimensional movement, so not just up and down, but side to side and rotational movements. We, not only, have a habit of being too sedentary but also training and exercising in a very one dimensional fashion. This leaves our glutes fairly underwhelmed.
So, how do we actually get the glutes to fire?
Although there is no literal need to throw out the trappings of modern life and return to an animalistic state in order to rescue our glutes, there may be a figurative one.
The best way to get the muscular system to activate, and to make any long term changes to the firing of muscles, is to make them do authentic movements. It is crucial for us to really understand what the gluteal muscles have evolved to do.
The glutes are designed to slow down and control our hip movements, both from the ground up and the top down.
Every time our foot hits the ground, the forces from above and below place a huge demand on our hips and the large glutes are there to cope with this significant work load. As the hips absorb movements such as landing or squatting (combined with gravity), the glutes fire in order to control this movement and convert these forces into elastic and kinetic energy. This energy is then utilised to fire us off into the next part of the movement, whether it be the next step or a jump from our squat.
If we want to train the glutes, then we need to create authentic movements at the hip. Only then will the nervous system recognise the movement and create the appropriate activation.
Glute bridges don’t cut it.
If you have been told that you have lazy glutes then you may currently be doing regular glute bridges to switch the blasted things back on again. This is where you lay on your back with your knees bent and lift your pelvis towards the ceiling.
Although this will indeed shorten the glute muscles and may cause them to fatigue – it is by no means an authentic movement. A glute bridge is not something that you are really required to do in daily life.
Putting one foot out in front of you, while reaching forward to pick something up is an action you are required to do frequently. Landing on one foot, while rotating your upper body, is a movement that you do every time you walk. By exercising and challenging the hips in these authentic positions, we begin to re-educate the glutes as to their true purpose. Our nervous systems are very plastic; they have the potential to adapt quickly. If we actually encourage the body to move in the way that it is designed to, our nervous systems will soon catch on to what we are asking of the body and begin to adapt and create the appropriate firing of muscles. If we continue to train in a non-authentic way, our nervous systems will remain confused and will seek ways of compensating – often leading to dysfunction.
Blog post by James Dodd

Standing desks…… a small note
I have just seen an article written in The Times yesterday by Carol Midgley on the subject of standing desks.
She talks briefly and mentions that ‘sitting is the new smoking’ and so she tries a basic device. This new device, you sit onto your existing desk to enable you to stand and work. I am not sure which one she tried, but here is a great example.
She says “So after a few days of spending eight hours of standing, am I convert?” “No.” “Not one iota.” She talks of it being harder to focus and harder on ‘the old plates of meat’.
When you start to run, you do NOT just go out and run for 2 hours! When you want to get better at hill walking, you certainly don’t start off with a long day in the Alps! With everything new for our bodies, you should start off by laying better and more solid foundations so that your body adapts to its ‘new’ needs. The better your ‘foundations’, the more adaptable and protective your body is for the stresses and strains that we place on it.
I suspect if Carol had started off by adding in an hour of standing and then sitting for an hour and gradually adding in a bit more, she would have felt better. This may need to happen over the course of a few weeks.
In my opinion, I don’t think standing desks are for people to stand all day. I think it is a much better approach to do some sitting and some standing and mix it about. Doing it this way, you may stand for 3, 4 or 5 hours over the day in total. Your body gets to experience both.
I also get patients to stand with their feet in different positions to add variability. It encourages you to move more and this undoubtedly IS good for you.
If you have any muscle or joint problems or would like to come and see one of our Osteopaths, call 020 8605 2323.
Blog post by James Dodd

3 tips for Knee Rehabilitation and the need to be patient!
My Knee Rehabilitation! Nothing much to write today, other than I have been gradually increasing the amount of walking I have been doing and very clearly, it was too much! My knee was feeling unstable and it was ‘talking’ to me more. It was not unstable in any way. But it was just telling me to back off and I needed to listen. Knee rehabilitation after surgery takes time!

My Knee Rehabilitation! Nothing much to write today, other than I have been gradually increasing the amount of walking I have been doing and very clearly, it was too much! My knee was feeling unstable and it was ‘talking’ to me more. It was not unstable in any way. But it was just telling me to back off and I needed to listen. Knee rehabilitation after surgery takes time!
At only just over 2 weeks post operatively, mild swelling and inflammation was still present and the areas that had been cut inside were still sensitive.
What I did note, was that there were other aggravating factors having an impact. My footwear and the terrain that I had been walking on.
My shoes have been harder underneath with little or no give; this would have created more ‘jarring’ through to my knee. We have been increasing the distance that was walked, this inevitably included more hills, both up and down. In Cornwall these can be steep, especially in some of the beautiful towns that we visited.
So what did I do? The patient backed off and walked less! I wore softer shoes with more give in the soles.
I STOPPED being stubborn and soldiering on! It is so easy to just say….”Let’s carry on, it will be fine.” Clearly, it was not!
But I kept on with the same exercises without adding any more and would resume with more as soon as I was able.
I kept on reminding myself. It was ONLY 17 days post surgery and I am good with that. Healing takes time!!
Those 3 tips I mentioned.
I have really found walking is great- it is ‘free’ and being outside is brilliant for you in so many other ways too. Integration of your exercises is really important. Trying to work your knee in an integrated way joins other joints and muscles together. Your knee never works by itself.! Don’t underestimate how important your foot is. Your knee is a bit of a slave to your foot and so a really well moving foot allows your knee to track and load with greater efficiency.
More soon.
As Osteopaths at Back to Back, we recognise that it is crucial for post surgical rehabilitation to be UNIQUE to THE INDIVIDUAL. Exercises should be given to YOU and for YOUR problem and for YOUR stage of healing. The progression of exercises is also unique to the patient and given under the advice of a good health practitioner.
The above is all the opinion of Back to Back.
If you are concerned in anyway about your rehab, do come in and see one of our highly trained team.
Blog by James Dodd

Ligament injuries of the knee and footballers!
Knee/ligament injuries within football
I recently read the article on the BBC website by Karl Braidwood on the angst of the increased incidence of ligament injuries in the football premier league. Here is a link to the article.

Knee/ligament injuries within football
I recently read the article on the BBC website by Karl Braidwood on the angst of the increased incidence of ligament injuries in the football premier league. Here is a link to the article.
It is well written with a good amount of detail and is looking at the opinions of the experts as to ‘why’ there has been such a great increase of ligament injuries in football over the past few years. It is massively expensive to have football players that are unable to play. They are taking about £177m in wages paid to injured (all injuries) players just last season!!! And of those, knee injuries appear to be the costliest!!
There are many contributing factors for this increase.
Several experts have given their opinions. Included in these is the amount of football played, the kind of footwear and the newer and more modern/harder pitches. Most of these make complete sense and I wanted to explore these a little.
The consultant talks about players overplaying and fatigue. This makes huge sense as the impact of the amount of training and games played per season is massive. The games are faster and more challenging. The players are certainly fitter than they were in the 60s, 70s and 80s….. they do train harder. The ‘capacity’ in their bodies needs to be there for them to play and train this way. If the capacity is absent or not available at the time and the player is fatigued, injury becomes more of a possibility as their bodies are less able to cope with the demand.
With the advent of modern pitch construction the pitches are much more able to cope with the wear and tear and still look great for TV with ‘whatever’ logo they choose to place on it….. But the pitches are harder and this also helps to prevent the player slipping. This will take its toll as there is less give under the players boot and the next link in the chain is the knee!! There is a balance between ‘zero’ give under foot and a small amount of give.
The ‘footwear expert’ talks about the ‘softer and less supportive boots’ are a large factor as to why knee injuries are more prevalent in football as the pace of the game is increasing exponentially. I am not so sure about this and feel that a stiffer boot will again put more strain up onto the knee.
For those of you that are old enough….. do you remember those fantastic ‘high-tops’ that were developed for basketball? They all wore them for some time. Then they realised that MORE injuries were happening. They took the high-tops out of the leagues and injury rates went back down again to where they were before.
What is really not talked about is the kind of training that they do do. Maybe it is that this needs to be changed or adapted to cope with the modern challenges that are faced of the fatigue and the different surfaces that are played on. I think that they could do much more three dimensional loading and improved training into how the body copes with changes in direction. This could be done with arms below their hips and overhead. The players bodies need to be taken gradually into those positions of ‘vulnerability’ to get them adapting to those ‘stresses’ and to get their neurological systems more ‘proprioceptively’ aware.
Sometimes we will get injured. It happens. There will always be injuries like Zlatan Ibrahimovic hurting his knee. Link here. He did land badly on one leg as he was travelling backwards and his body was very upright…….. his knee just ‘had no place to go’.
If you are concerned about your knee or any other muscle or joint, come in and see one of our great osteopaths who can fully assess and treat you.
The above is the opinion of Back to Back and is not in any way intended as advice. IF you are concerned about your training and want more information, see a great health professional.
Blog post by James Dodd

Rehabilitation story – Knee arthroscopy
I sustained a tear on the inner rim of my medial meniscus. It hurt and made a pop when I landed and gradually I became less able to walk and climb stairs. Dog walking made me sore and grumpy….. Exercising just left me in pain. I had had some regular treatment on this, since the injury and it was not helping.
My Story - James Dodd
I sustained a tear on the inner rim of my medial meniscus. It hurt and made a pop when I landed and gradually I became less able to walk and climb stairs. Dog walking made me sore and grumpy….. Exercising just left me in pain. I had had some regular treatment on this, since the injury and it was not helping.
I chose to go and get my knee scanned. I took home the disc and looked at the images at home. Immediately, it was apparent that there was a tear in an area that takes load and the snapping was my meniscus being pushed out of the way.
Grrrrrr. Next step was to see Adrian Fairbank. A knee orthopaedic surgeon. I did not take this step with easily. I had had 10 treatments and this and the exercises were not working. The tipping point for me was when my function was actually getting worse!
Adrian was thorough. He questioned, examined and looked at the MRI and confirmed my thoughts. I had medical insurance and so we decided to try to fix this as soon as….. ‘Soon as’ was two days later!!
The operation went without any concerns or problems and I was home just after lunch. I had been given some very basic post operative exercises to keep my knee mobile and help with the inflammation. I did as I was asked.
I had some pain and anti-inflammatory medication and due to the higher risk of Deep Vein Thrombosis (DVT) post surgery, I was told I needed to wear a stocking for 2 weeks. This went all the way from my left foot up to the top of my thigh!
Why are there risks of DVT. Here is a link
After two days of ‘pottering’ and some time off my feet. I started to do a little bit more. Just little bits of walking is good – I was limping and it was sore, so I was careful to avoid doing too much. What I did start to do was more on my other leg. I started to do some basic single leg squats and some pistol squats and for my upper body, I used my TRX to start pushing and pulling work. It is important to keep the upper body control there. I feel that many people have such a large disassociation between their lower and upper bodies. The balance, in my opinion, needs to be better.
Day 4
It was still pretty sore and my range of motion still limited. Stockings were still to be worn for the next 10 days.
Squatting and adding load to my left knee was still too much, so I was starting to do some hand/arm reaches with my feet in various positions. I was trying to be as functional as possible with my exercises. These were really to keep my body working as an integrated unit. If my legs were wide appart with my left leg forward, I could reach with my right hand to the left at shoulder height or take my left hand overhead to the right.
I managed to walk for just over a mile. I actually felt I could do more. But felt I should be sensible as I was still only 4 days post surgery. What would I be telling my patients?? ‘Rest a bit and give it time for the swelling and the inflammation to subside’. ‘Add in exercises gently’.
Tomorrow we are to set off to Cornwall for almost two weeks. This is one of the reasons why I chose to have my knee done at this time. I could then use my time away to rehab my knee to give it the very best chance it could get. We were driving early, hoping to miss the morning traffic. So we packed the car today. This involved a fair amount of stairs and carrying bags and some kettlebells?! As part of my rehab work, I had decided to take with me the RIPtrainer, the TRX and various kettlebells. I often use these along the rest of my training as the TRX is about ‘body weight’ exercises which I love and they can both be used extremely effectively for multidirectional training.
For some pretty dumb reason, I made it my business to put most of this into the car from the garden including and many trips up and down the stairs.
Day 5
Getting up early, my knee was more stiff and more painful than yesterday. I suspect sleeping on my side my knees a little bent did not help and then almost 6 hours in a car (with knee bent). Grumble……I then did some more lifting to empty the car. …. More grumble…. I was suffering for my excess yesterday and this morning! I had done way, way too much. Bit of a wake-up call really. Quite simply, it was my body telling me that I had done too much. It was also more puffy than it had been. But I suppose this is to expected. We decided to put my leg up and straighten it for a bit – this did feel good and it helped calm it. I then also did some more of the exercises I was given at the hospital to encourage drainage and reduce swelling.
This is MY story of MY knee. Everyone will be different. It is important to get advice from your osteopath or physiotherapist with regards to your rehab post surgery. YOUR rehabilitation is crucial ……. you do need to do this to give your body the very best chances for full recovery.
Day 9
It is now nine days post knee arthroscopy. How is that knee doing and what is it feeling like?
It certainly still gets sore if I do too much. We walked a bit further yesterday (on road and more hills!) and as I got near to ‘you have done too much’… it felt ‘unstable’… that was the only way I could describe it?! So I backed off and rested it a bit. Later than day we did a bit more flat walking and it was ok. Loading my knee and stairs are still slow, but that is to be expected. The stitches are dissolving and wounds heeling.

Exercises
I have stopped the original exercises that I was given and doing all my exercises upright now.
Beyond walking, I am not ready to involve exercises with stepping just yet, so they are to be closed chain with my left foot fixed on the ground.
Knee is not too keen in sagittal plane (SP) (knee bend) loading, but I can load my left hip into rotation and SP. I can also load my hip into the frontal plane …. but interestingly, my knee feels ok with this too. Using the Gray Institute’s 27 different foot positions, I am positioning my feet to add small ‘loading’ to my hip and knee with my foot on the ground. The knee is less keen to work with my left leg behind me…. and easier with my leg in front. It is also easier if my left foot is turned in a little, which asks more from my butt/gluts.
Short hand notes say ‘left leg forward’ is called LXX and with your left leg forward, but a wider stance is called LWX.
So in LXX and LWX, I am fixing my knee at about 20º and using ‘top-down’ trunk movement, I am loading my hips and trunk with various hand reaches. I am also doing some of these with a straight knee and allowing it to bend to a max of 20º. I am making sure that these are NOT painful and I am able to achieve them, so that my brain does not perceive these movements as a threat. These exercises are proprioceptively great too!
I am doing a few sets 3-4 times a day. I am also using the TRX as before keep my upper body conditioned. It is funny to see how easily I forget to do them and so I have set reminders on my phone and have also used the “wallpaper’ screen on my phone, so that each time I look at my phone it says ‘do your exercises!!)
Knee arthroscopy is not a small undertaking and it really highlights how important your rehabilitation is to get youback to function.
Function is about doing what you need to do as part of your day to day activities. In my opinion, our lives do involve bending and squatting to various degrees. It does involve reaching and twisting and it does involve coordination and us being able to control our balance and movement onto one leg. This also involves various combinations of all of these movements. We want to walk, pick things up off the floor, we sit, we twist and reach to get things off shelves. To most, this is just life.
The aim of Functional Rehabilitation is to get people getting back to what they are capable of and so all of my exercises are as close to ‘real’ function as possible. None of my exercises are with me on the floor bending my knee or on my side lifting my leg up and down! I want to load my body and replicate normal movements with much more efficiency, in a way that my body recognises and remembers.
My life certainly involves all of the above and so much more. For completeness, my rehabilitation will involve many of these movements and my knee exercises are just integrated into these.
13 days post surgery

Sleeping is better and I can find more ways to lie on my side without discomfort. I am still a little stiff in the morning.
The last couple of days have produced a good shift. I am walking better with improved control. I am able to do slower ‘high knee’ walking. My exercises have started to include reaches with a small knee bend. Caution is still high on my radar as I can still feel a ‘bite’ if I bend my knee too far with load. I am yet to use a forward step in my exercises, but I really feel that this will be soon. I am now also able to do exercises with my right leg forward too. This was previously painful.
I am doing more frontal and transverse plane loading. These include small lateral and rotational reaching with the aim of working the muscles of my butt, but also the ones in my thigh. These all involve ankle movement, so I am encouraging good foot biomechanics. Going forwards, I will be using some correctly placed foot wedges to use with some of my exercises to integrate better ‘ground reaction’ and ‘push off’.
As Osteopaths at Back to Back, we recognise that it is crucial for post surgical rehabilitation to be UNIQUE to THE INDIVIDUAL. It really is not good enough to be given a sheet of exercises that are not tailored to the individual and being asked to ‘get on with them’. The progression of exercises is also unique to the patient and given under the advice of a good health practitioner.
The above is all the opinion of Back to Back. If you are concerned in anyway about your rehab, come in and see one of our highly trained team.

Rucksacks and back pain
Rucksacks…. how to pack and wear them to avoid back pain.
Many of us now sensibly wear a rucksack to work or school. Some have had advice that it would be a better way to carry their gear to work or school and others have just found that is just helps in their overall day to day efficiency. We often see patients who wear their packs poorly and this may have been a contributory cause to them suffering with back pain and them needing to see an osteopath.
At Back to Back, we regularly see patients coming in wearing their backpacks. This is great, but often they wear them in a way that over time, adds more additional load to their bodies that is needed or good for them. Getting this right is key to a more efficient body and hopefully less back pain.
Here are some basic tips to consider when putting things into your pack.
Ideally, have the correct pack to meet your needs. Unfortunately, one pack does not meet the requirements of all jobs!
Decide what you NEED to take with you. Don’t pack it with lots of unnecessary items. People often walk around with items in their bags that are rarely used or have never been used.
They say that one should organise your ‘kit’ into groups. This sounds a bit mad, but what it really means is that different weights and bulkier items should be placed in your pack differently.
For work, we are unlikely to be taking a sleeping bag, but we need to load the heaviest items low down and close to our backs. This is nearest to our centre of gravity. Wrongly placed heavy items can lead to us being unbalanced and strained.
Lightest items go on top.
Now…. almost the most important part is that once on your back, the sack needs to sit snug to you body and the upper part of the pack against the upper part of your back. Often we see patients who wear their packs hanging as low as their bottoms. This is not good! Walk along the street and you regularly see children wearing their rucksacks this way. This pulls you off balance and backwards, excessively straining your body. This can often lead to lower or upper back pain or even hip pain.
For those that are interested look to this link on ways to pack your backpack and adjust the advice appropriately for your work bag use.
Blog post by James Dodd

Motivation
As an osteopathic clinic we regularly try to motivate our patients to improve their health to encourage healing and better function of the body. This can be through exercise, diet, weight loss or just allowing more time for oneself.

The definition of motivation is ‘internal and external factors that stimulate desire and energy in people to be continually interested and committed to a job, role or subject, or to make an effort to attain a goal’.
As an osteopathic clinic we regularly try to motivate our patients to improve their health to encourage healing and better function of the body. This can be through exercise, diet, weight loss or just allowing more time for oneself.
It may be the motivation to move better or become pain free that’s required. Sometimes large lifestyle adjustments are needed to create a space for change. Often though, we come across a lack of motivation, despite patients really wanting the end goal.
Those that have been successful in what they do must have had some degree of motivation. Some people aim to reach or exceed expectations, some like recognition or responsibility and others like personal advancement or growth. Many are simply motivated to help others.
Can we inspire people who are not motivated or have no desire to make changes even though it will undoubtedly improve their health? I think you can, but it can be tricky. Finding that gateway to positive thoughts and feelings is different for everyone so it’s a matter of wading through the options until you find something that sticks.
Here are a few tips on achieving what you want through motivation:
Smart goal setting. Remember the goal you set must be realistic, timely, attainable and specific.
Self-Efficacy. Believe in yourself. Those with high levels of self-efficacy believe in their ability to perform a task and achieve goals. Take a look at the reasons you have decided you can’t do something and check the facts/evidence. Often there isn’t as much standing in your way as you thought.
Little by little. Sometimes the goal can be overwhelming, so start small and set targets. Make changes bit by bit. Create a new routine using repetition and before you know it you’ll be doing the change instinctively and enjoying the benefits. Then implement the next change and so on.
Motivate others to achieve or create change. The way you would motivate and encourage a colleague or friend, do this to yourself in the same way.
Going forward……try to empower yourself and set yourself little goals to achieve something that you would not normally do. Once you have achieved these small things – encourage yourself to do a little bit more. It can be amazing and wonderful at the same time when you do achieve what you have set out to do, how good it can make you feel.
Remember how THAT made you feel and hopefully it will motivate you to do more.
Blog post by James Dodd

iKids and screens…
You know kids love looking at screens. According to a 2015 study, British children between 5 and 16 years old spend an average of 6.5 hours a DAY looking at screens! The article is pretty in-depth and is listening to the thoughts of psychologists and their concerns of how the escalation of children (both young and old) using ‘screens’ is affecting their wellbeing.

The Times on Saturday yesterday did a great article called ‘I can’t walk yet, but I know how to work an iPad’. It is a great article talking about the affects of ‘screen time’ on children. The front page even goes so far as to state “Daddy won’t give me a cigarette, so why does he think a tablet is OK?’ Yikes!!
You know kids love looking at screens. According to a 2015 study, British children between 5 and 16 years old spend an average of 6.5 hours a DAY looking at screens! The article is pretty in-depth and is listening to the thoughts of psychologists and their concerns of how the escalation of children (both young and old) using ‘screens’ is affecting their wellbeing. In November, the American Academy of Pediatrics reduced the recommended screen time for children of under five by half to just one hour a day. Babies under 18 months, they advised, should avoiddigital media altogether.
There is a best selling New York author has just released a new book ‘Why we can’t stop checking, scrolling, clicking and watching’. This kind of says it all. There are many über clever people in Silicon Valley (and all over the world) with a huge and detailed understanding of what drives us as humans and they have made it ‘their’ business to make sure we cannot put down their hardware or apps.
This has prompted a boom in what Alter (a psychologist) calls “behavioural addictions”. And Facebook and the like have not even got started yet. They are gradually building bigger and greater portfolios about us all so that we can become even bigger targets of digital media.
Where it becomes more dangerous is when kids get bored and use the devices as a mental crutch! Turn to the device…. What shall I do next? Turn to the device….. I have a bit of time…. turn to the device. Children have not yet developed developed self control. So they are an even bigger target as future users. Relationships of all kinds will suffer too.
There was some recent hard research out about the use of social media and its links to depression. We need to be careful.
So I think my point of this is do we need to stop giving very young children tablets and phones? I think we probably need to think a lot more about it than we do and then decide. Steve Jobs would not allow his kids to use an iPad at home!
Blog post by James Dodd

Nutrition for training (Before and after)
A useful link for those looking to gain more information about nutrition for pre and post exercise
For those looking to gain more information about nutrition for pre and post exercise have a read here.
Brian also breaks it down for body types and the type of exercise you are about to do.
